You will need the following materials:
~ At least 60 size 1 or larger diapers (newborn are just too small)
~ Clear (or I used the pastel colored) small hair ties
~ A base of some sorts (Shawn cut me a 12" circle from cardboard and it worked perfectly)
~ 2 baby bottles. At Walmart they had BPA free bottles for $.98!
~ Ribbon to wrap around the tiers of the cake
~ Double sided sticky tape or a hot glue gun (I used a glue gun)
~ Flowers or toy topper
Step 1:
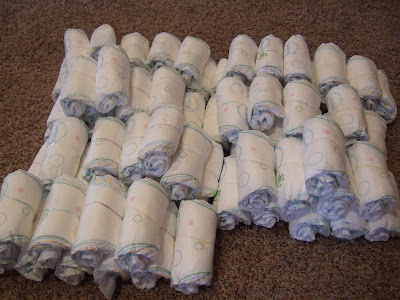
Get rolling! Take each diaper and begin rolling from the waste band down. I used Huggies diapers and rolled them so that the outside edge that showed would be mostly white.

Wrap a small, clear or pastel, rubber band around the middle of the diaper as shown. Aren't you glad I showed you a picture of that? Ha!

Keep rolling and rubber banding until you have a nice stack of diapers! It really doesn't take that long. I watched TV and this step took a lot less time than I anticipated.

Step 2:
Prepare your base if you are making one. I saw a lot of people used pretty cake platters and that would save you a step here. I don't own a pretty cake platter so I'll share what I did! Shawn cut me a piece of cardboard and I used scrapbook paper to make it pretty. I realized that the edges were yucky and I wouldn't be able to stand looking at them so I decided to hot glue a simple white ribbon around the edge. I felt much better after doing that!
 Step 3:
Begin assembly. I filled the bottom bottle with m&m's. I don't think you have to fill it with anything, but I thought it would be a nice surprise. *Note* I had to go back later and take the top of the bottle off because with the two bottles stacked on top of each other, they were too tall. I simply put plastic wrap around the top and secured it with a rubber band.
Wrap one rubber band around the bottle. Then, slip the rolled up diapers between the rubber band and bottle. Once you have that first layer, place a large rubber band around all of those diapers and start your second layer by slipping diapers between the first row of diapers and the large rubber band. Once your second layer is done, place another large rubber band around those diapers and begin placing diapers for your third layer.
Use the bottle for the second tier of the cake as well. Simply place a rubber band around it and begin slipping diapers between the bottle and the rubber band. For the second tier only use 2 layers of diapers.
You will notice now that you have a place to put the second bottle on top of the first one. Use that bottle to make the third and final tier. This tier will only have 1 layer of diapers.
 Step 4:
Finishing Touches! I wrapped the ribbon around the diapers so the rubber bands were all hidden. This is where you could use double stick tape if you have some. I hot glued the ribbons together in the back of the cake. Don't glue the ribbons to the diapers so that the expectant parents can use the diapers later!
Use the open top bottle to secure your topper. If the shower is for a girl baby, you could slide some pretty flower stems into the bottle to create a flower topper. Since, this shower was for a little boy and I didn't think the dad would appreciate flowers, I opted for this cute little toy. I just shoved the little cow's back feet in the opening of the bottle and he fit perfectly for the top of the cake.
 This was a fun little project and I really enjoyed it. I am sure you can get really crafty and use all kinds of ribbons and toys to make it ultra cute!


Okay, that is awesome!! And beautiful!!! You are quite the crafty lady. Lauren looks great. I'm glad things are going well. Love ya girl.
ReplyDeleteThat's awesome! I love it. :)
ReplyDeleteYou're simply amazing! You make everything sound easy and fun.
ReplyDeleteI can't believe how quickly Lauren is growing! Where is the time going?
That is such a cute idea. You did a great job! Your so crafty!
ReplyDelete